Linux LVM is stands for Linux Logical Volume Manager. In Linux, LVM is used to manage hard drives and other storage devices. As the name suggests, it can convert physical storage into logical storage, which make it easy to use.
LVM Features
- Flexibility – allow for resizing of volumes.
- Snapshots – allows for “point in time” copies of your logical volume.
- Can be used for nearly any mount point EXCEPT /boot.
- Can install and handle any type of file systems.
In this tutorial, we will learn how LVM works on Linux operating system with an example. You guys can run these commands on any Linux OS. LVM works same for all the other Linux distribution.
With the help of this tutorial, you guys can learn how we can create partitions, physical volumes, virtual group, logical volumes and file systems on the hard disk with help of LVM. By the end of this tutorial, you guys will get a full understanding of how to use LVM, how we can mount, remove, and extend logical volumes and how we can apply our own configurations.
Read Also: How to Create Directory in Linux Using Mkdir Command
Prerequisite
- Linux based Server (CentOS, Ubuntu, Debian and Red hat).
- Root user or other User with sudo privileges.
Install LVM
To install LVM, run the following command.
For Ubuntu and Debian
sudo apt install lvm2 -y
For CentOS and Red Hat
sudo yum install lvm2 -y
Create partitions
Before starting the creation of partition, first we need to check the available disks which are connected to our server or system.
- To check the disks, run the following command.
fdisk -l
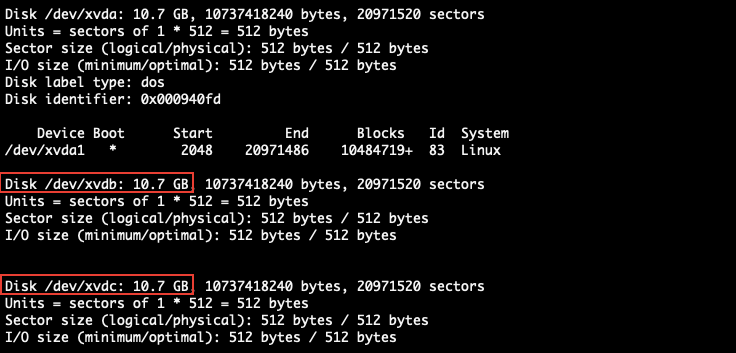
As you guys can see, We have two different disks /dev/xvdb and /dev/xvdc 10 GB each.
- Now let’s create the partitions from the disks with the help of cfdisk command. Run the following command to create the partition.
cfdisk /dev/xvdb
After executing the above command, you will see a console. We will use this console to create and manage the partition.
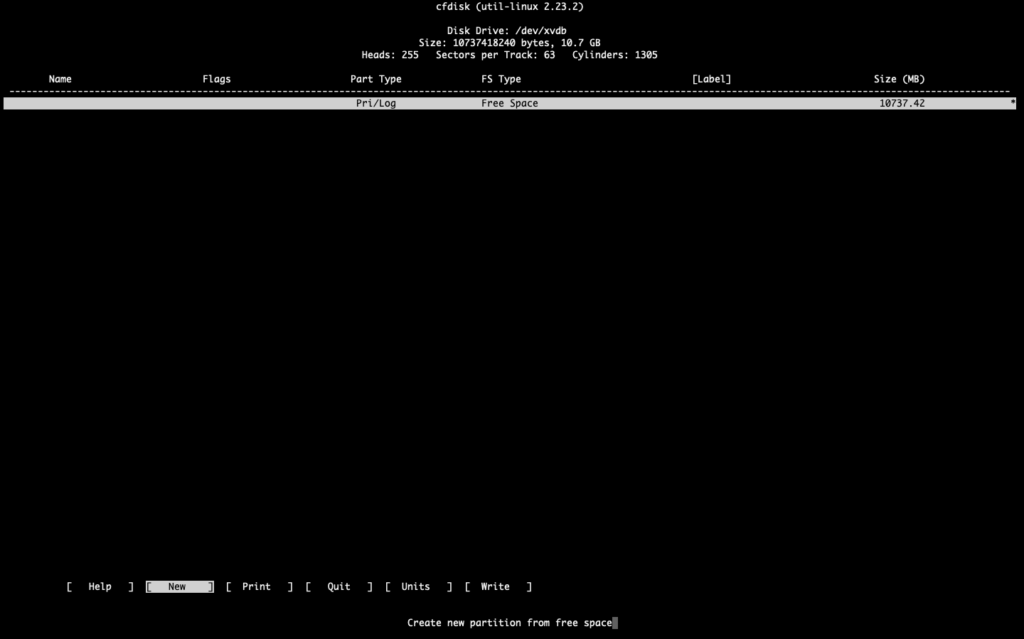
- Select New and press Enter button.

- Select the Primary and press Enter button.

- Enter the Size of the partition and then press Enter. If you want to use the whole disk, then simply press the Enter button without modifying the default size.

In my case, I am using the whole disk (10 GB).
- Select the Type and press the Enter button.

In Type, we will select the file system for the partition.
- Enter 8E to select Linux LVM file system and press the Enter button.

- Select the Write and press the Enter button.

- Type yes and press the Enter button.

- Select Quit and press the Enter button.

Note: Repeat the same steps to create the partition for the “/dev/xvdc” disk.
- Now check the partitions.
fdisk -l
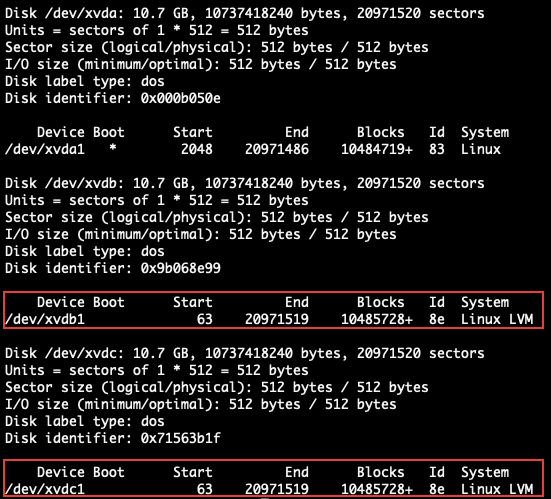
We have successfully created the partitions.
Create physical volumes
Now we can create Physical volumes from the partition which we have created earlier.
- Run the following command to create the Physical volume from the /dev/xvdb1 partition.
pvcreate /dev/xvdb1

- Run the following command to create the Physical volume from the /dev/xvdc1 partition
pvcreate /dev/xvdc1

- Now check the Physical volumes.
pvdisplay
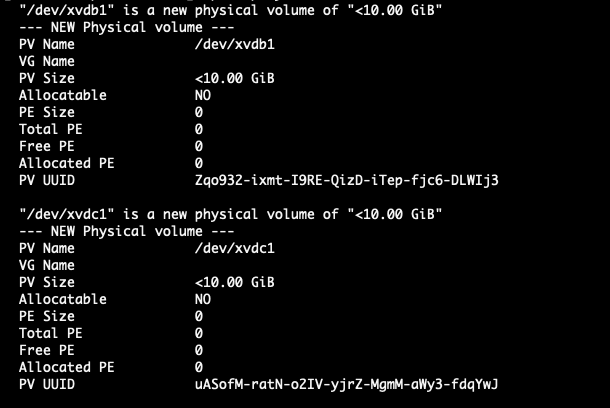
As you guys can see, we have successfully created two Physical Volumes.
Create a virtual group
We need to create a virtual group which we will use as a container for our Physical volumes which we have created above.
- Create the Virtual group and add both the Physical volumes to it.
vgcreate vg_new /dev/xvdb1 /dev/xvdc1
You can assign virtual group name as per your choice.
- Run the following command to see the information of the virtual groups.
vgdisplay
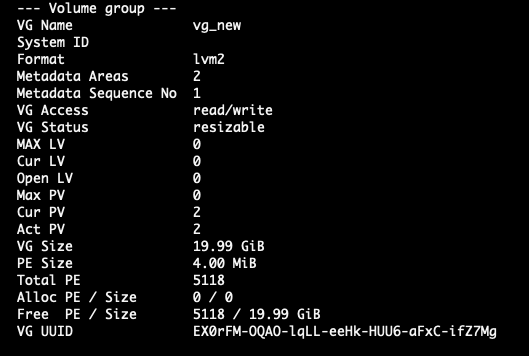
As you guys can see, we have around 20 GB in vg_new virtual group.
- If you want to add more physical volumes in the Virtual group, then use the following command.
vgextend vg_new /dev/xvdd1
Create logical volumes
Now create logical volumes from the Virtual Group.
- Run the following command to create 20 GB of logical volumes from the virtual group. You can define the size as per your choice.
lvcreate -L 20000 -n vol_1 vg_new

You can assign logical volume name as per your choice.
- To check the logical volumes, run the following command.
lvdisplay
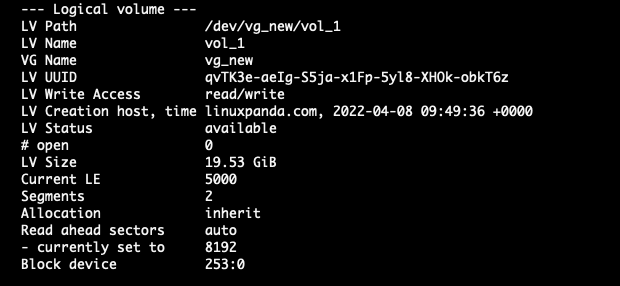
- Check the free space left in vg_new virtual group with help of vgdisplay command.
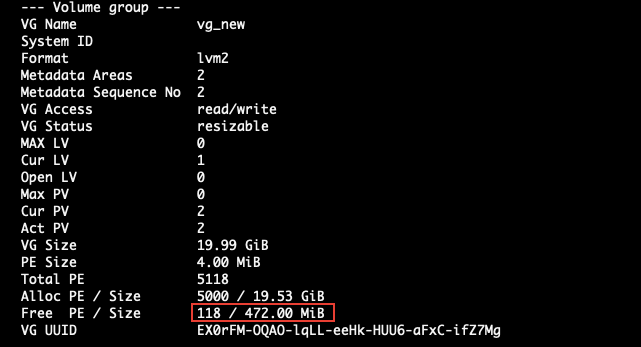
As you guys can see, we still have 472 MB left in our Virtual Group.
File system on logical volumes
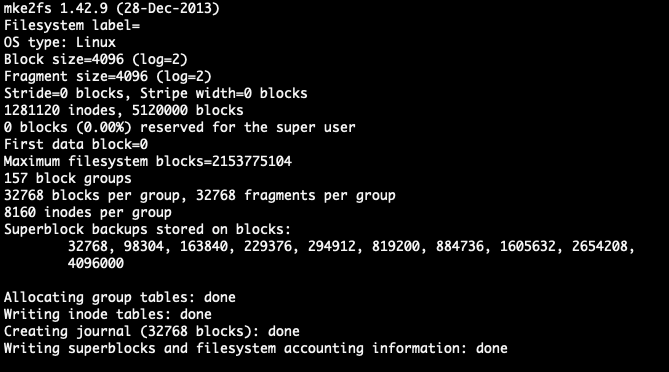
Now we need to create a File system on the logical volume with the help of mkfs command. Run the following command to create the File system on vol_1.
mkfs.ext4 -m 0 /dev/vg_new/vol_1
Mount partitions
To mount the logical volume, edit and add an entry in /etc/fstab.
- To edit the /etc/fstab file, run the following command.
vim /etc/fstab
- Add the following lines in /etc/fstab file.
/dev/vg_new/vol_1 /new_disk ext4 defaults 0 2
Replace /new_disk with the name which you want to mount on your system or server. Save and exit from the file.
Mount logical volumes
To mount logical volumes, run the following commands.
- First, create the mount point.
mkdir /new_disk
- Now, mount the Logical volume in order to use it.
mount -a

Extend a logical volume
We can extend logical volume at any time when we are running out of space. For example, we still have 472 MB left in our Virtual Group. Now we will add other 400 MB in the logical volume.
lvextend -L +400 /dev/vg_new/vol_1
Above command will only add the 400 MB in the logical volume, but File system still have no idea about the extended space which we have added.
To update and resize the file system to use that extended space, run the following command.
resize2fs /dev/vg_new/vol_1
In many old systems, To extend the logical volume. First, we have to unmount the volume before running e2fs command.
umount /new_disk
e2fck -f /dev/vg_new/vol_1
resize2fs /dev/vg_new/vol_1
Remove Logical volume
To remove logical volume, run the following command. Make sure that the logical volume is unmounted.
lvremove /dev/vg_new/vol_1
Remove Virtual Group
To remove a virtual group, run the following command.
vgremove vg_new
Remove Physical Volume
To remove a physical volume, run the following command.
pvremove /dev/xvdb1
Conclusion
In this tutorial, we have learned about the LVM and its features, How we can use LVM to create and manage the Partitions, Physical volumes, Virtual groups, File system and Logical volumes. LVM is an enormous topic to discuss. In the future, we will discuss more other useful feature of LVM.
If you guys have any queries related to this tutorial, then let me know in the comments sections.
Read Also: How to Install and Configure OpenVPN in Ubuntu 20.04?







Leave a Reply