PostgreSQL database management system, also known as Postgres, is an open-source and advanced object-oriented relational database. It is the first database management system designed specifically for UNIX-based environments. You can modify and use PostgreSQL in any format according to your needs. Its source code is freely available under the license of PostgreSQL. Read below guide on Install PostgreSQL on CentOS 7
Prerequisites
- Linux Operating System (CentOS 7).
- Access of the Root User or User with sudo privileges.
First Method – Installing PostgreSQL with the CentOS repositories
Default CentOS repositories contain the PostgreSQL package. But, that not be the latest version of PostgreSQL. To install PostgreSQL from the default CentOS repository follow the below steps:-
- Login to the server with the help of the SSH command.
ssh user@Server_IP
- To install the PostgreSQL package run the following command.
sudo yum install postgresql-server postgresql-contrib -y
- Now we need to initialize the database with the following command.
sudo postgresql-setup initdb
- Start the PostgreSQL service.
sudo systemctl start postgresql
- Enable the PostgreSQL service so that it can automatically restart after the server reboot.
sudo systemctl enable postgresql
Second Method – Installing PostgreSQL with PostgreSQL repository
This method installs the latest PostgreSQL version from the official website. At the time of writing the latest PostgreSQL version is 14.4. To install the latest version of PostgreSQL follows the below steps:
- Login to the server with the help of the SSH command.
ssh user@Server_IP
- Download the PostgreSQL package with the help of the wget command.
yum install -y https://download.postgresql.org/pub/repos/yum/reporpms/EL-7-x86_64/pgdg-redhat-repo-latest.noarch.rpm
- Now install the PostgreSQL with the following command.
yum install -y postgresql14-server
- We need to initialize it before using it for the first time. To initialize run the following command.
/usr/pgsql-14/bin/postgresql-14-setup initdb
- Start the PostgreSQL service
systemctl start postgresql-14
- Enable the PostgreSQL service
systemctl enable postgresql-14
- Check the status of
systemctl status postgresql-14
- To check the PostgreSQL version
psql --version
Configure the PostgreSQL Server
With the default configuration, PostgreSQL only listens on localhost. It means Nobody can access PostgreSQL from the outside of the server. To allow remote connections we need to modify the PostgreSQL configuration.
Edit the PostgreSQL configuration file.
vim /var/lib/pgsql/14/data/postgresql.conf
Search for the listen_addresses and set its value to ‘ * ‘. Save and exit from the file.

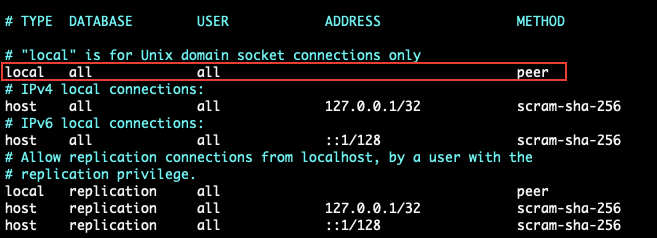
Now edit the pg_hba.conf to allow PostgreSQL users to use password-based authentication method to log in. Edit the pg_hba.conf with the following command.
vim /var/lib/pgsql/14/data/pg_hba.conf
Now find the following line and Replace the peer with md5.

After the above changes pg_hba.conf file will look like this.

Restart the PostgreSQL service.
systemctl restart postgresql-14
Access the PostgreSQL server
To log into the PostgreSQL server, run the following command.
sudo -u postgres psql
Set a strong password for the postgres user (PostgreSQL user).
postgres=# \password

Creating a Database
To create a database run the following command.
create database linuxpanda;
To check the databases run the following command.
\l
Creating a User
To create a user run the following command.
create role linux with login createdb password '8eVS(?G*y!';
To check the user run the following command.
\du
Grant Privileges
After creating the User and the database, now we need to grant the privileges to the user. So that, the user can access and modify the database.
grant all privileges on database linuxpanda to linux;
Login to the PostgreSQL with the New user
To log into PostgreSQL with the newly created user, run the following command.
psql -d linuxpanda -U linux -W
If you want to connect the PostgreSQL from the other server, then you can use the below command.
psql -h server_ip -d database -U user -p 5432
Remote access for the PostgreSQL server
To allow remote access to the PostgreSQL server, simply edit the pg_hba.conf file with the following command.
vim /var/lib/pgsql/14/data/pg_hba.conf
Add the following lines at the end of the pg_hba.conf file.
host    all             all              0.0.0.0/0                       md5
host    all             all              ::/0                            md5
Restart the PostgreSQL service.
systemctl restart postgresql-14
Deleting a Database
To delete any database in PostgreSQL, we simply use the drop command.
drop database linuxpanda;
Deleting a User
To delete any user in PostgreSQL. First, we need to revoke all the privileges from the User. To revoke all the privileges run the following command.
revoke all privileges on database linuxpanda from linux;
Now, we can delete the User with the following command.
drop role linux;
Conclusion
Using PostgreSQL, we have demonstrated how to Install PostgreSQL on CentOS 7 and also demonstrated how to setup PostgreSQL, but there is still much to learn.
If you guys have any queries then let me know in the comments section.


Leave a Reply