In this tutorial, we have learned about MongoDB and its features. We have also learned how we can install and configure MongoDB on Ubuntu 20.04 and how we can create an Admin and simple users with a database.
What is MongoDB?
MongoDB is a NoSQL database server widely used to develop modern and dynamic applications. It uses a JSON-like format to store documents. The purpose of MongoDB is to build applications with fast scalability and flexibility. All types of businesses and development teams use MongoDB.
With horizontal scaling and load-balancing capabilities, MongoDB offers levels of scalability and flexibility to the developers. MongoDB Atlas is a cloud-based database service supported by most cloud platforms such as AWS, Azure, Google Cloud, etc.
MongoDB offers both a community edition and an Enterprise Edition. The community edition is a free version with limited features and the Enterprise Edition is a subscription-based version that offers Auditing, On-disk encryption, LDAP, and Kerberos support, etc.
Prerequisites
- Server with Ubuntu 20.04
- Access of the Root user or another user with Sudo privileges
Installing MongoDB 5 on Ubuntu
To install MongoDB follow the below steps one by one.
- Before starting the MongoDB installation, update all the server repositories and install some pre-required packages on the server.
Read Also: Setup OpenVPN client for Windows
sudo apt update -y && sudo apt install wget vim gnupg -y
- Now import the MongoDB public GPG key with the following command.
wget -qO - https://www.mongodb.org/static/pgp/server-5.0.asc | sudo apt-key add -
- Add the MongoDB repository to the server.
echo "deb [ arch=amd64,arm64 ] https://repo.mongodb.org/apt/ubuntu focal/mongodb-org/5.0 multiverse" | sudo tee /etc/apt/sources.list.d/mongodb-org-5.0.list
- Enable the MongoDB repository on the server, by updating the server repositories.
sudo apt update -y
- To install the latest MongoDB version run the following command.
sudo apt-get install -y mongodb-org
- Start the MongoDB service with the following command.
sudo systemctl start mongod
- To check the MongoDB version run the following command.
mongo --version
Configuring MongoDB
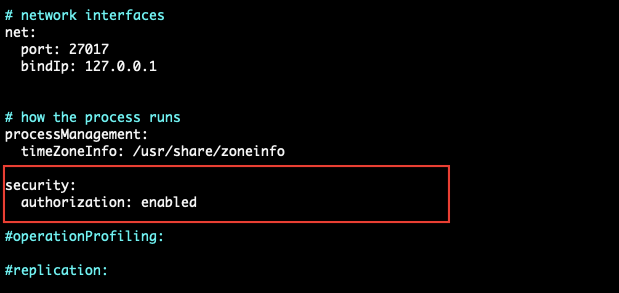
The default MongoDB configuration is sufficient. However, for the production environments, we need to implement security by enabling the authorization in MongoDB. To enable the authorization, open the /etc/mongod.conf file in edit mode.
The authorization option allows role-based access control (RBAC), which regulates user access to the database’s resources and operations. Without authorization, any user can access any databases and can execute any action.
sudo vim /etc/mongod.conf
- Add the following lines if not exist in /etc/mongod.conf. If similar lines already exist in the file then modify them as mentioned below.
security:
  authorization: enabled
The security section will look like this.

- Restart the MongoDB service after modifying the MongoDB configuration.
sudo systemctl restart mongod
Create an Admin user in MongoDB
To create an admin user, we need to disable the security (authorization) which we have enabled in the above section. Simply comment both the lines with the ‘#’ symbol and then restart the MongoDB service.
After disabling the security, enter the database server with the help of the mongo command and then use the following command to select the admin database.
use admin
After selecting the database run the following command to create the admin user. Replace the linuxpanda_admin and Password as per your choice.
db.createUser(
{
user: "linuxpanda_admin",
pwd: "Password",
roles: [ { role: "userAdminAnyDatabase", db: "admin" }, "readWriteAnyDatabase" ]
}
)
Now again enable the MongoDB security and then restart the MongoDB service.
Create a user in MongoDB
To create a user in MongoDB you need to have Admin user access. Log into MongoDB with the admin user and then run the below commands. Otherwise, disable the security (authorization) which we have enabled earlier and then restart the MongoDB service.
Enter the database server with the help of the mongo command and then use the following command to create or select the database.
use database_name
After selecting the database run the following command to create the user. Replace the Username and Password as per your choice. The database name must be the same as which you have used in the above command.
db.createUser(
{
user: "linuxpanda",
pwd: "Password",
roles: [ { role: "dbOwner" , db:"Database_name"} ]
}
)
Login into the MongoDB server
To log into MongoDB run the following command with the user and database name. AuthenticationDatabase is the database under which the user is created.
mongo -u user -p --authenticationDatabase database_name
To allow remote connections
By default, MongoDB is configured only for the localhost connections. To allow remote connections we need to modify the MongoDB configuration.
- Open the /etc/mongod.conf in edit mode with the following command.
sudo vim /etc/mongod.conf
Find the network interfaces section and replace the 127.0.0.1 with 0.0.0.0 to allow remote connection on MongoDB.
# network interfaces
net:
  port: 27017
  bindIp: 0.0.0.0
The network interfaces section will look like this.

To apply all these changes restart the MongoDB service with the following command.
sudo systemctl restart mongod
Conclusion
If you guys have any queries then let me know in the comments section.


Leave a Reply